Exercise 1: Create a new repository
In this exercise, we will create a new repository and examine its contents. Again, if you would like
A) Create a new repository
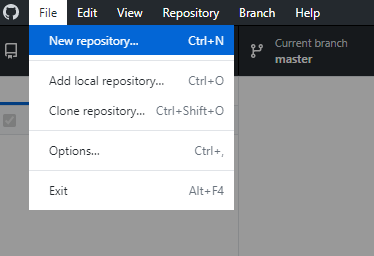
Open Github Desktop, select the “File” dropdown menu and choose the “New Repository” option.
After doing so, you will be presented with a window specifying options for creating the repository.
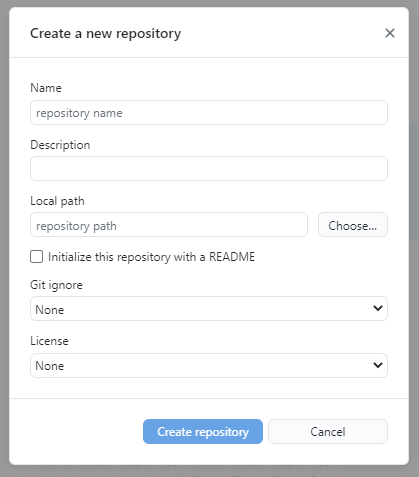
Let’s walk through the different fields.
Name
Here you should provide a name for your project. Use something memorable that would make sense to both you and any potential collaborators. Repository names can only use letters, numbers, hyphens, and underscores. Any other characters will be replaced with a hyphen.
Description
A short 1-2 sentence description of the project that will be organized in this repository. This is an optional field, but it’s a good idea to use it as this is the first step to documenting a project.
Local Path
In order to track changes to a project, Github needs the contents of the project to be stored in a folder. This field specifies the location of that folder. You can either create a completely new folder (if building a project from scratch), or specify an existing folder on your computer that already contains a project.
For this workshop, I’d suggest creating a completely new folder so you can build a repository from scratch. Choose somewhere easy to access so you can return to this project throughout the workshop.
Initialize with README
The next option is a checkbox indicating whether to initialize the project with a README file. A README is a text document that can provide a summary or information about a project. Think of it as analogous to the abstract in a scientific paper. Creating a README is optional, but recommended and common practice for Github. For this workshop, go ahead and select the checkbox so that the repository includes a README.
Gitignore
We’ll come back to this later, but it’s possible to specify certain files or types of files that Github should not track. For now, just leave this box alone.
License
This box has options for automatically choosing a license for your project. A detailed discussion of licenses is beyond the scope of this workshop, but I’d encourage you to learn about them separately. If you are interested, this site can help you choose a license, and you find a more in-depth discussion about licenses here.
If you’re not sure what to use, just leave this box as “None”. For the most part, using no license retains the rights to a work with you. However, projects without a license aren’t actually open source, so it’s best to only use this as a temporary measure until you decide on a license.
Create
Once you’ve finished with the fields, you’re ready to create a repository. Go ahead and click the “Create Repository” button.
Demo
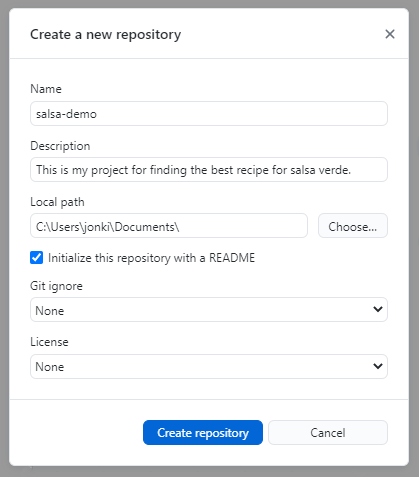
I’m going to use a demo project to help illustrate some of the exercises. My demo will be for a research project focusing on finding the best recipe for salsa verde. I’m going to name the demo repository “salsa-demo” and use the description: “This is my project for finding the best recipe for salsa verde”. I’m going to initialize it with a README, but no .gitignore or license.
B) Explore the local repository
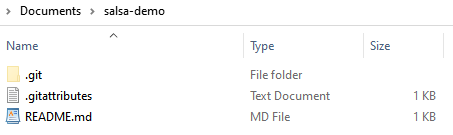
So you made a repository, nice! Go ahead and navigate to its folder on your computer (remember, this is wherever we set the local path). Inside you should see three items
- A folder named “.git”,
- A file named .gitattributes, and
- A file named README.md
For example, after creating my demo repository I have:
The “.git” folder and “.gitattributes” file include various settings and files required to make git and Github work properly. In general, you won’t need to interact with them. The file “README.md” is the file created when we selected the README checkbox. The “.md” signifies a “markdown” file, which is a human-readable text file that also supports some formatting options (like italics, bold, and links). If you’re curious, go ahead and open it in a text editor. You should see the repository name followed by its description.
For example, here are the contents of README.md for my salsa repository:
# salsa-demo
 This is my project for finding the best recipe for salsa verde.
So, we’ve now created a repository for a project. In the next exercise, we will see how to publish the repository to the cloud so that we can start making commits and pushes.